Workspaces
Introduction to Workspaces for RES
Workspaces is a secure and efficient portal designed specifically for authenticated bank staff, and is the post submission module used in the Retail Onboarding application.
It serves as a comprehensive platform for reviewing and approving tasks related to account opening and customer onboarding, supporting resolution and customer service activities.
In the RES solution, Workspaces supports to two distinct workflows:
- Deposits Products - This workflow allows users to review processes related to various deposit products, ensuring a seamless experience for both staff and customers. Additionally, users can see the reasons why an application is not Straight-Through Processed (STP-ed), enabling them to address issues promptly and improve service quality.
- Lending Products - This workflow enables users to review and approve processes for lending products, with an added decisioning workflow to streamline operations and enhance service delivery.
Workspaces configuration
Workspaces in the Retail Origination application has been pre-configured using the default Temenos branding and functionality, as a good example of what functionality is available.
However, banks can re-configure the Workspaces branding, spaces, queues, and UX in their own environments. As access to the Workspaces spaces and queues is controlled by user permissions, Workspaces can be configured to use single or multiple roles, with access to single or multiple spaces.
Workspaces in the Retail Origination application has been pre-configured to use the Retail Manager permissions with access to the Assisted Channel and Process spaces.
For more information on using and configuring Workspaces, refer to our Workspaces User Guide and technical documentation.
Workspaces space navigation
The Spaces allows you to see all available spaces and the permissions you have been granted. Here’s a breakdown of each space and its functionality:
- Process Review - This space is for processing staff and relationship managers (RMs) to view and claim any pending tasks to move applications forward. Tasks may include reviewing customer documents, approving underwriting stages etc.
- Helpdesk - This space enables support staff to quickly and easily locate any application to provide necessary assistance, such as finding reasons for onboarding errors, fraud reviews, or other issues. These errors are often related to system integrations.
- Assisted Channel - In this space, RMs and assisted channel staff can initiate the application and monitor its progress.
- Manage - This space offers task management capabilities for managers and supervisors, such as re-assigning tasks, and monitoring task completion.
List and Details screens
Each space within Workspaces consists of two main pages: a List Screen and a Details Screen.
- List screen - The List Screen is where you can locate applications. Use this screen to search for and identify the specific application you need to review or service the applicant.
- Details screen - Once you’ve found the application on the List Screen, click on it to view it on a Details Screen. This screen provides in-depth information and allows you to perform various tasks related to the application.
More Information
- To learn more about spaces, see Workspaces > Roles and spaces.
- To learn about configuring space permissions, see API > Workspaces > Permissions.
Deposit workflow in Retail Onboarding
In the Deposits Products workflow within Workspaces, you can easily manage and monitor the status of applications.
The status of an application can be one of the following:
- Saved - The application has been saved but not yet submitted.
- In-Progress - The application is currently being processed.
- Completed - The application has been fully processed and finalized.
Deposit Application Steps
- STP (Straight-Through Processing) - The steps for processing deposit applications depend on the STP outcome.
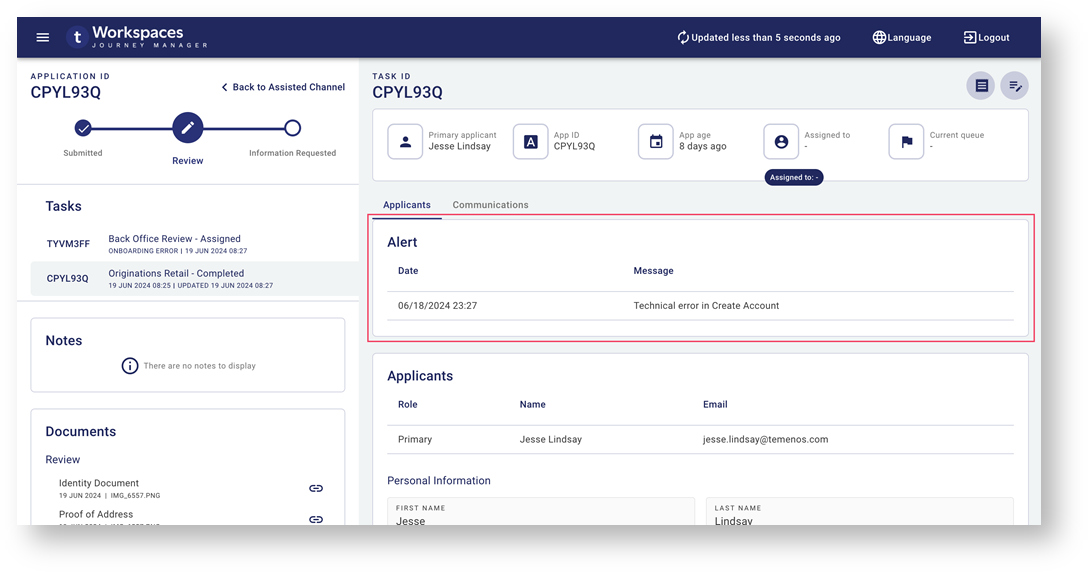
- Non-STP - These applications are processed automatically and require no manual intervention. These applications may encounter onboarding errors. To understand and handle these errors, navigate to the Helpdesk space and check the Alert card (see below). This card provides specific information about the error, enabling quick diagnosis and resolution.
Lending workflow in Retail Onboarding
In the Lending Products workflow within Workspaces, the application process is structured into several key stages to ensure thorough review and approval.
However, this flow is optional and can be configured based on client needs, such as integrating with the client’s Loan Management/Origination System after the form is submitted.
Here’s an overview of the lending application flow:
Submit Online Application
- The customer submits their application online.
Prescreening
- KYC Review: Conduct Know Your Customer (KYC) checks to verify the identity of the applicant.
- Compliance Review: Ensure the application complies with regulatory requirements.
- Documents Review: Verify that all documents are in order.
Credit Packaging
- Bureau Checks: Perform credit bureau checks, which can be integrated with third-party services.
- Decision Engine: Use the decision engine to evaluate the application.
- Decision Outcome: Determine the outcome based on the decision engine’s evaluation.
Underwriting
- Generate the offer letter based on the underwriting results.
Closing
- Signing Ceremony: Finalise the agreement with the customer through a signing ceremony.
- Account Origination: Originate the account to complete the process.
Lending Application e2e flow
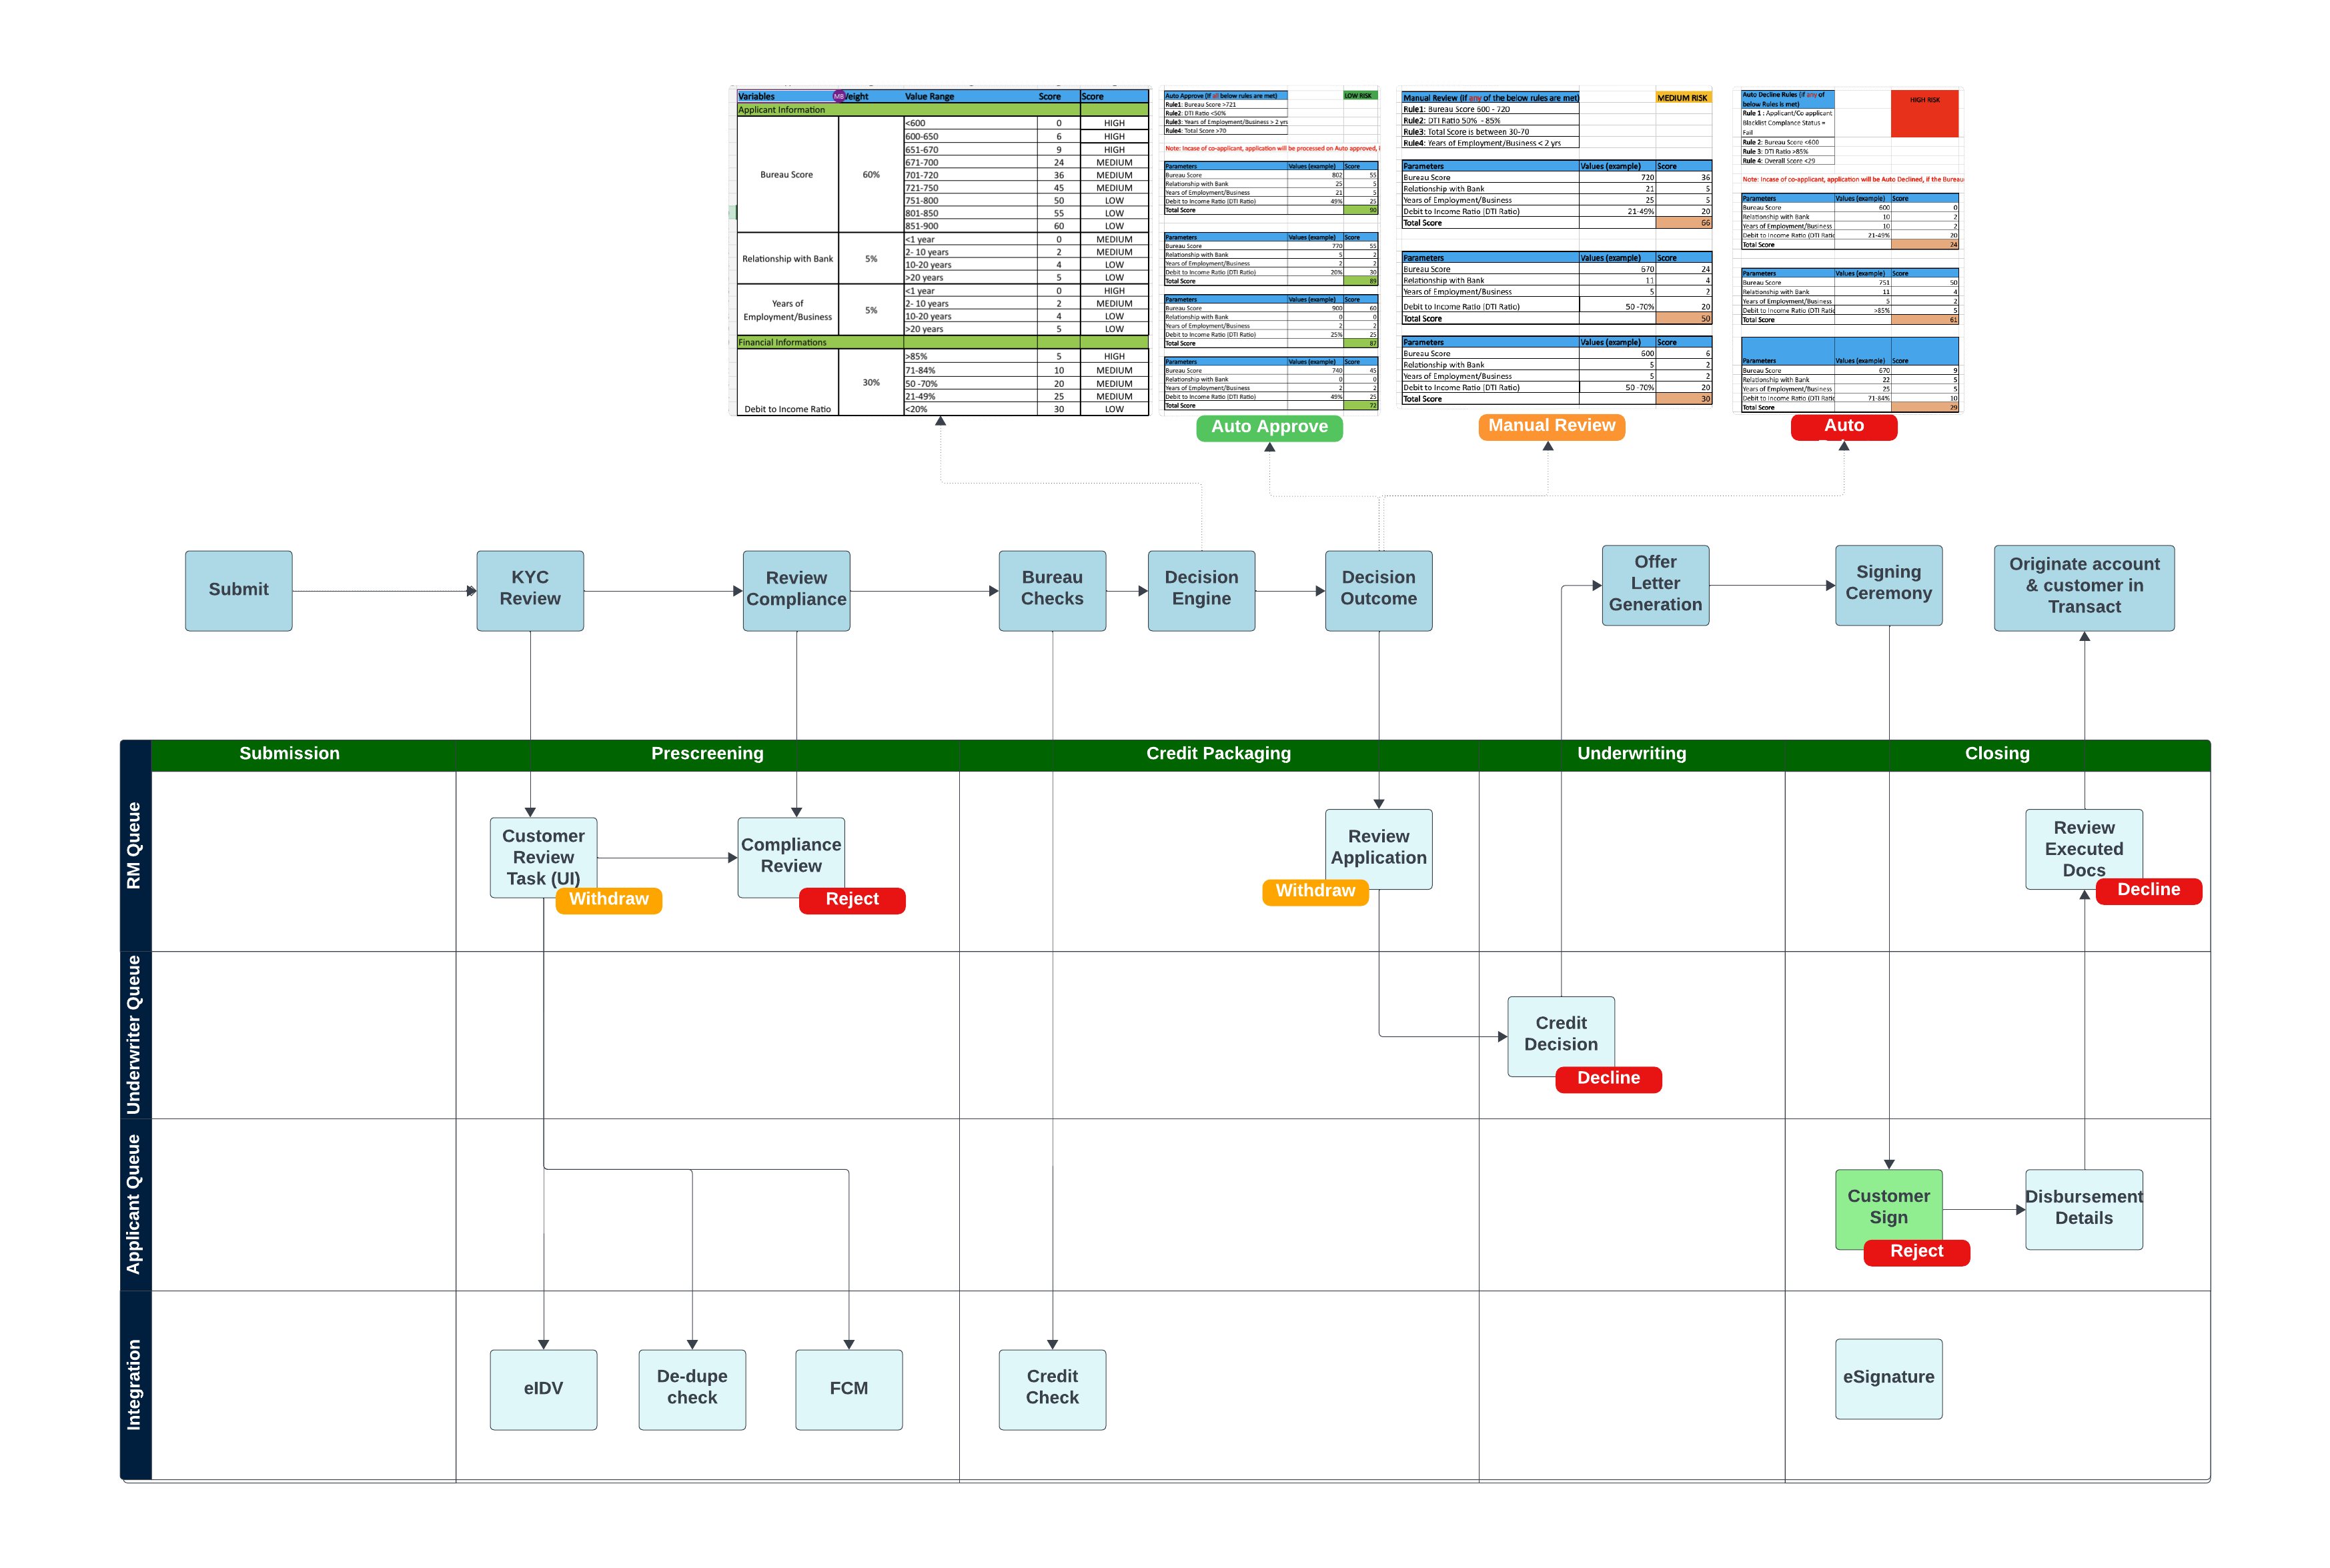
In the Credit Packaging stage, the decisioning process and decision parameters in the end-to-end flow are fully configurable. Additionally, they can be replaced with third-party services as needed to meet specific client requirements.
Prescreening Step
In the Prescreening stage of the Lending Products workflow within Workspaces, several key features and steps are designed to facilitate a thorough and efficient review process:
Locate the application
- Navigate to the Process > Review space and enter the application ID in the search bar to find the specific application.
Application Timeline
- The Application Timeline visually indicates the current step of the process, helping staff track the application's progress easily.
Tasks
- The current task is assigned to the back office for review. Staff members need to click Claim to take ownership of the task.
KYC review
- Once the task has been claimed, review the Financial Crime Mitigation section to ensure the KYC checks have passed. This is a crucial step in verifying the identity of the applicant.
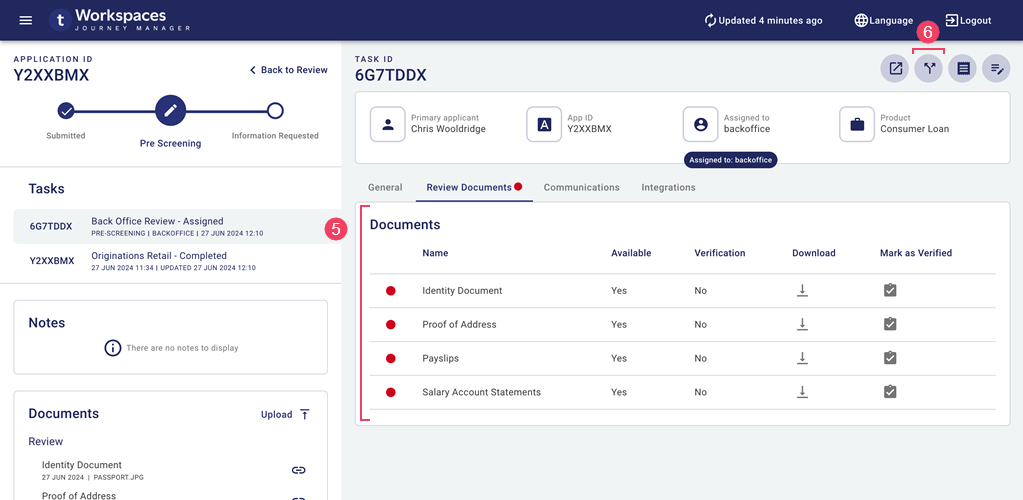
Document review
- A red dot on the Review Documents tab indicates that there are documents needing review and verification. Click on this tab to access and verify the required documents.
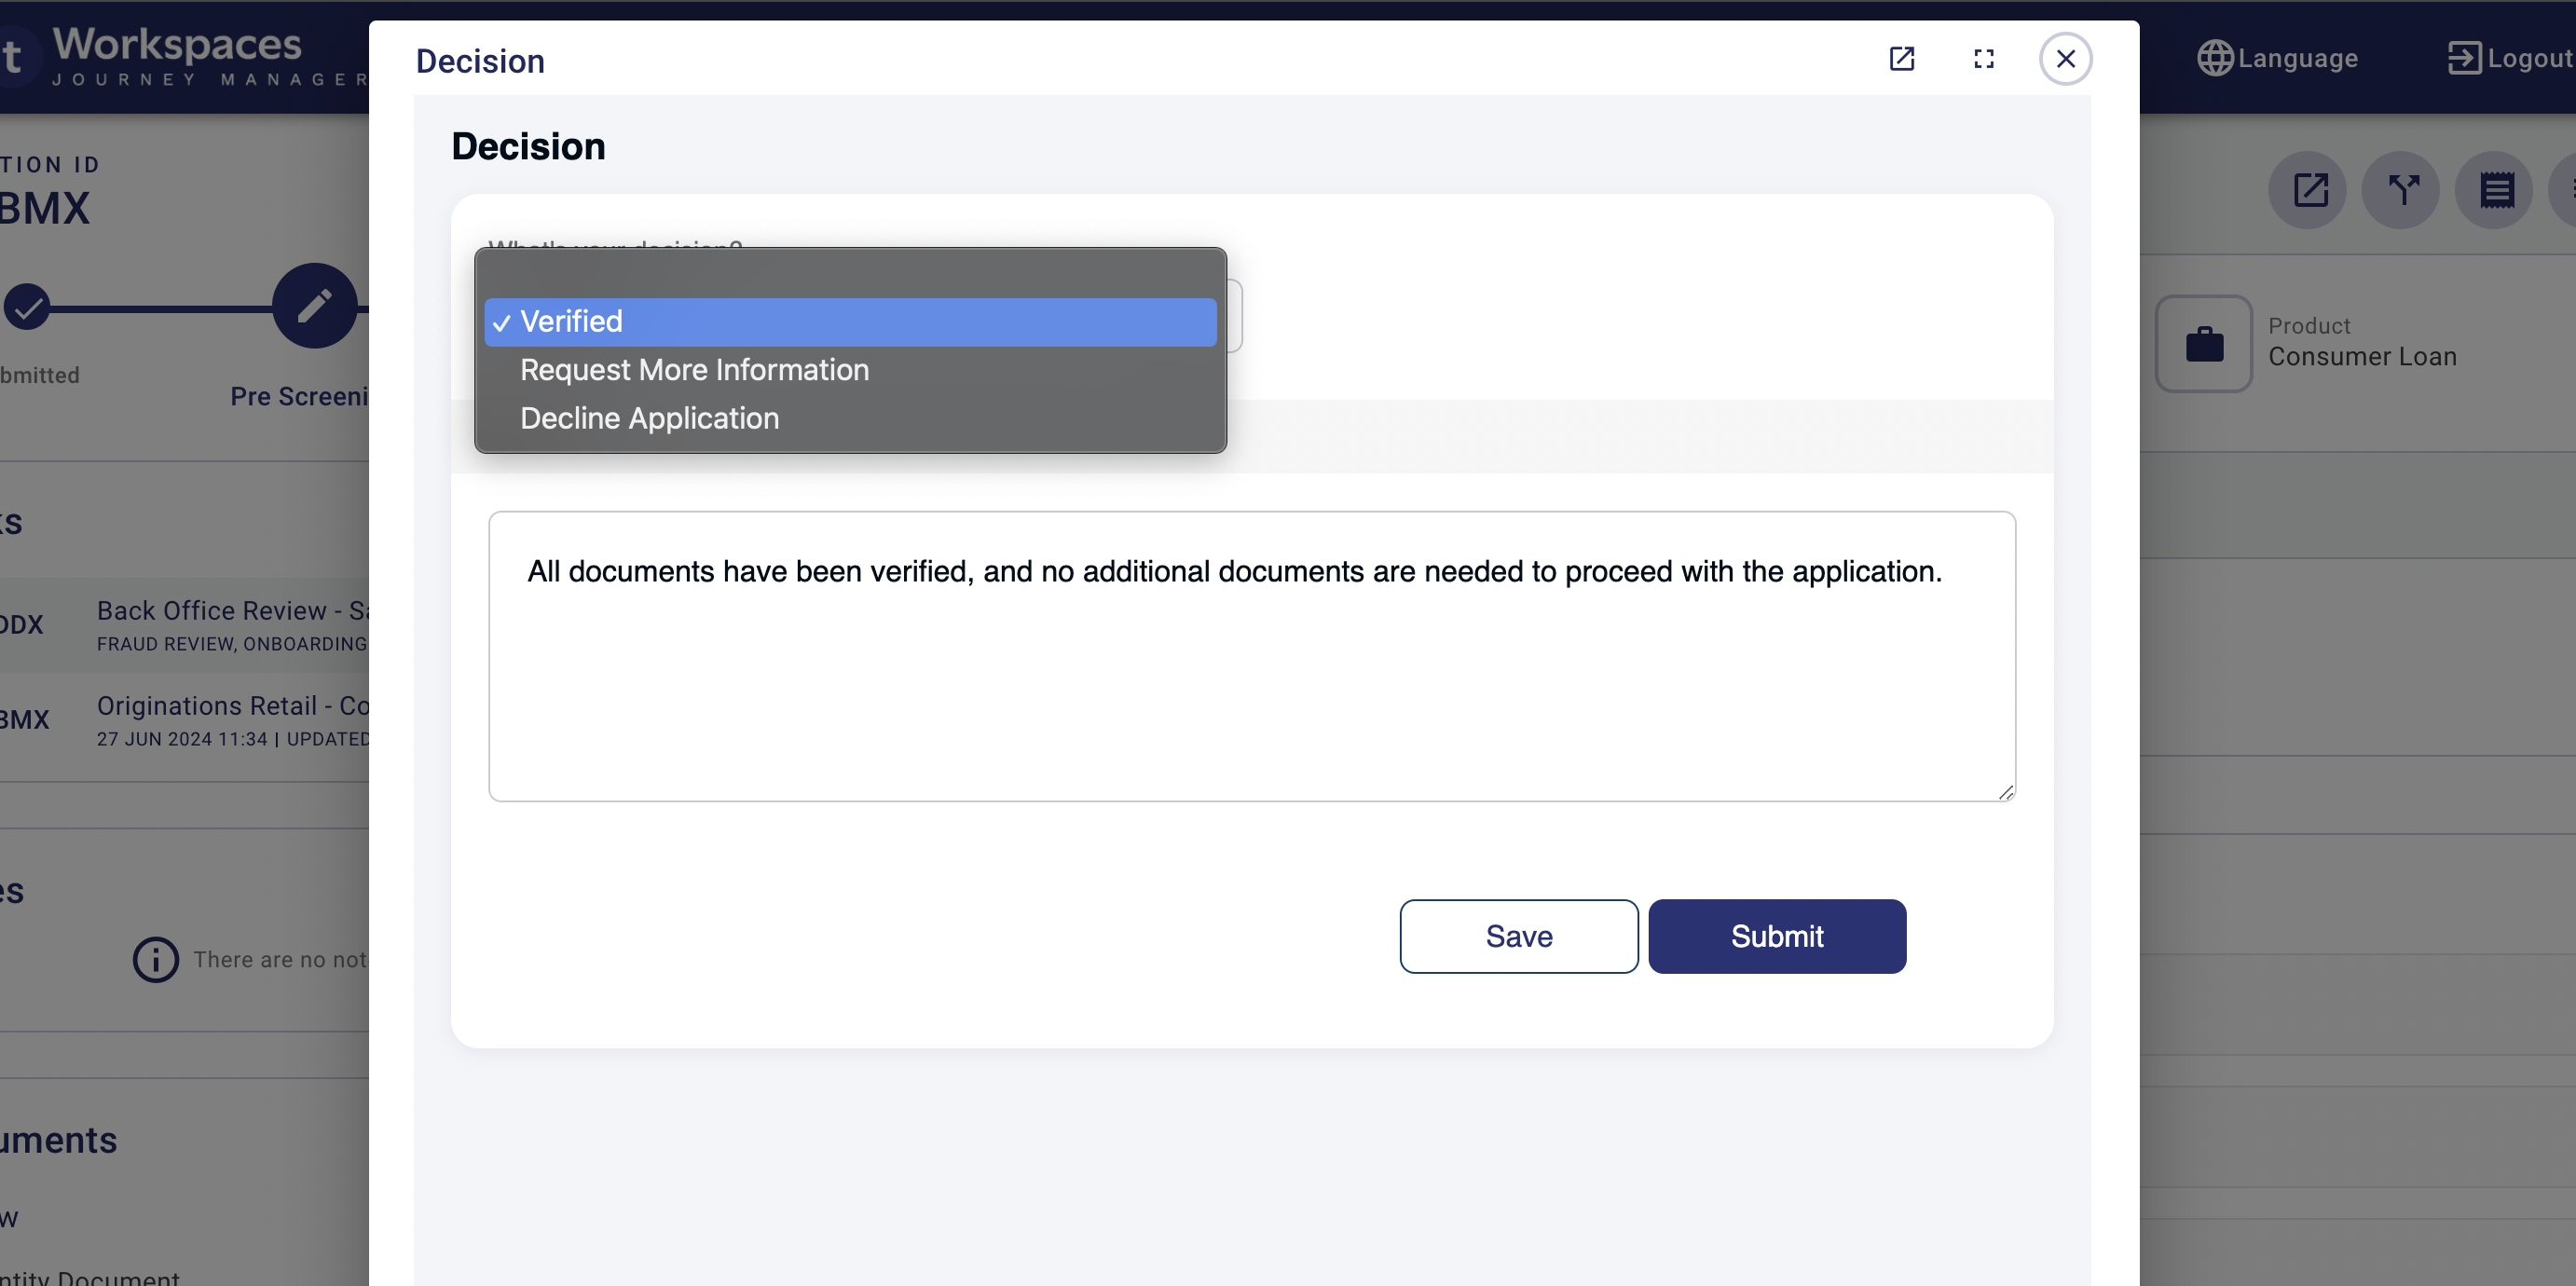
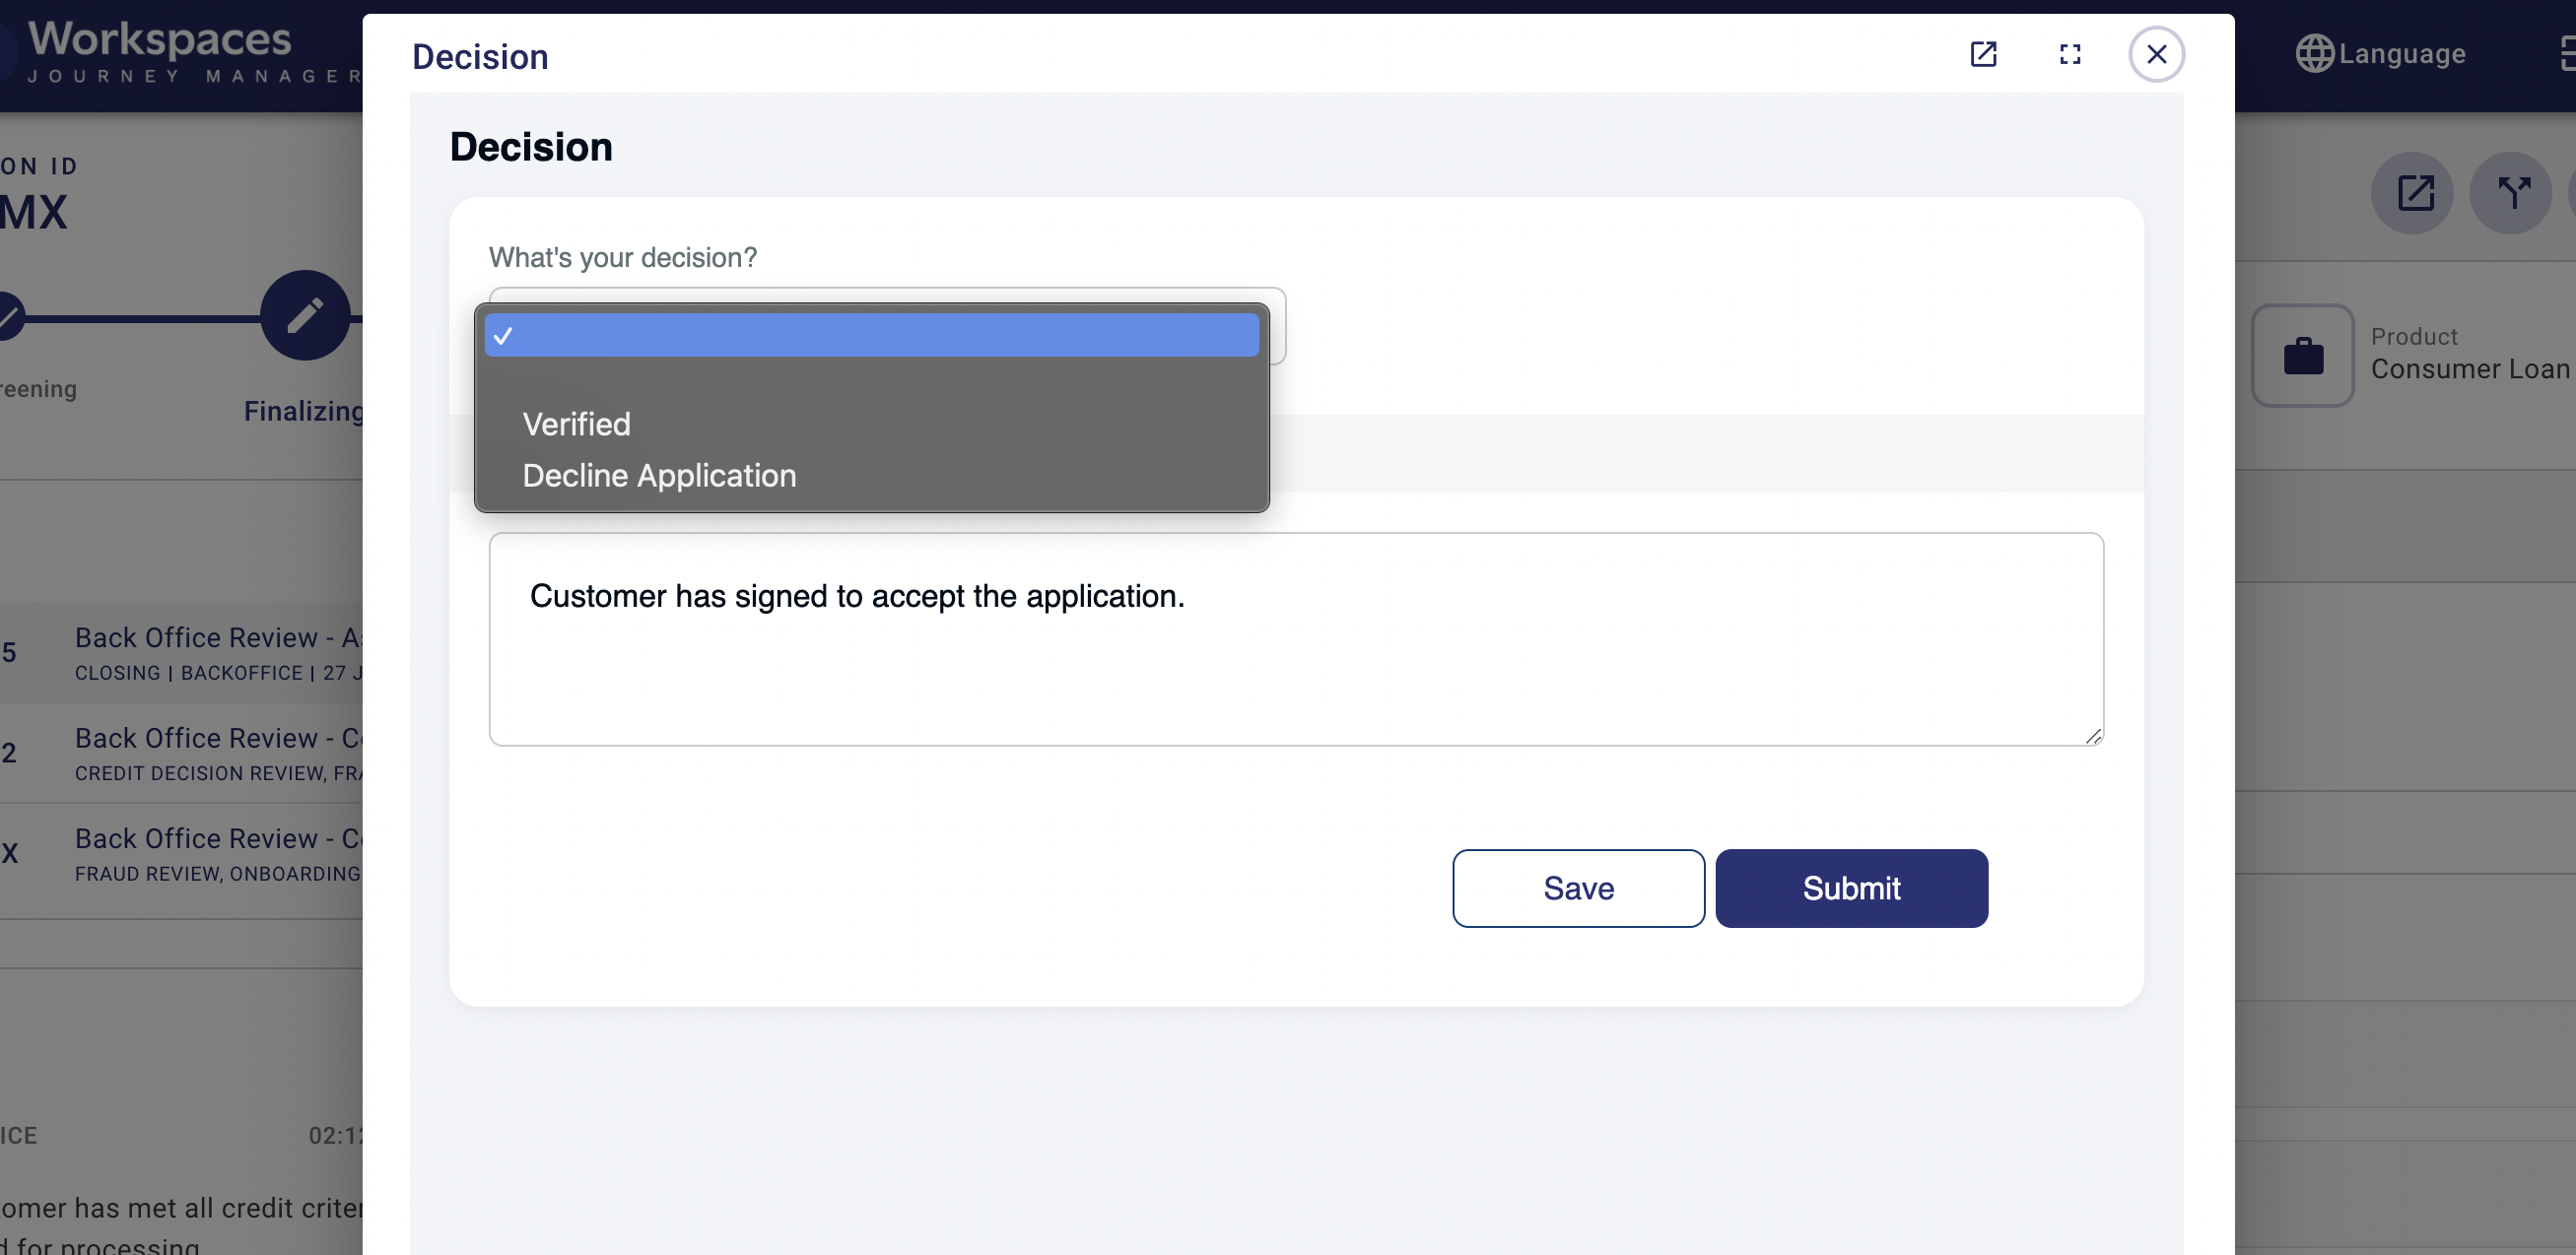
Make a decision
- To complete the prescreening stage, click Decision to make a decision. Select the appropriate decision from the options provided. If more information is needed, an email will be automatically sent to the customer requesting the necessary details.
Screenshots
Process > Review
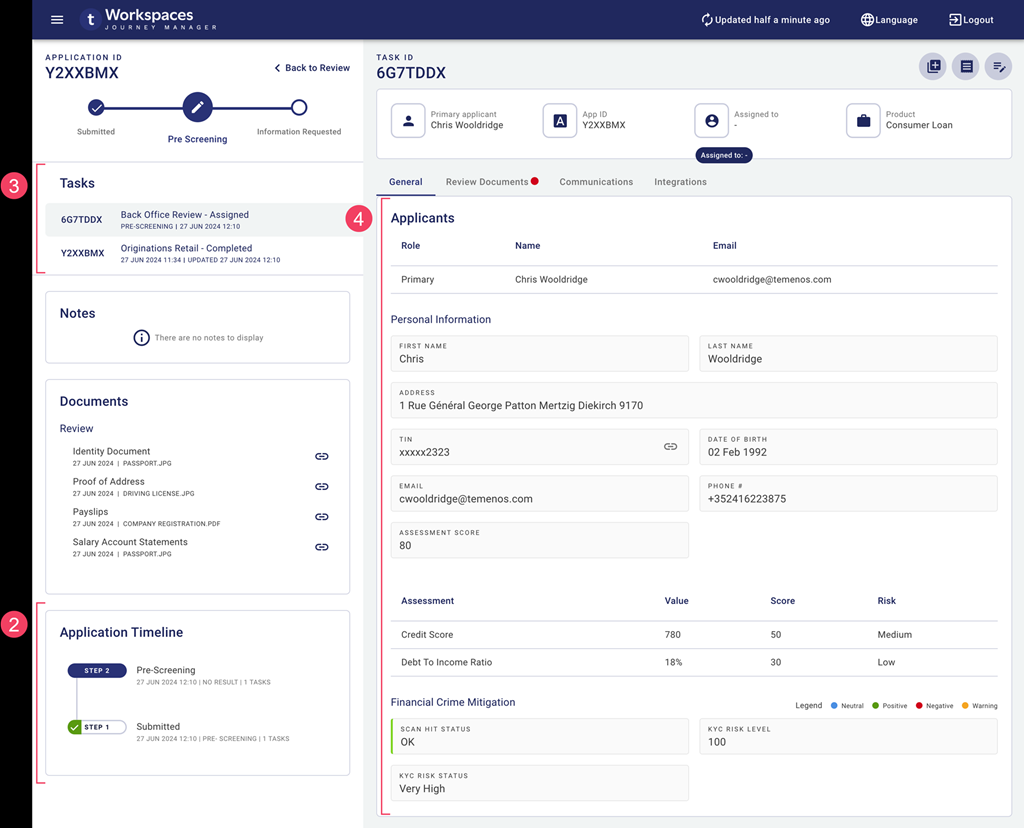
Review Documents tab
Review decision
Credit Packaging & Underwriting Step
In the Credit Packaging stage of the Lending Products workflow within Workspaces, the following key features and steps facilitate a thorough credit review and decision-making process:
Locate the Application
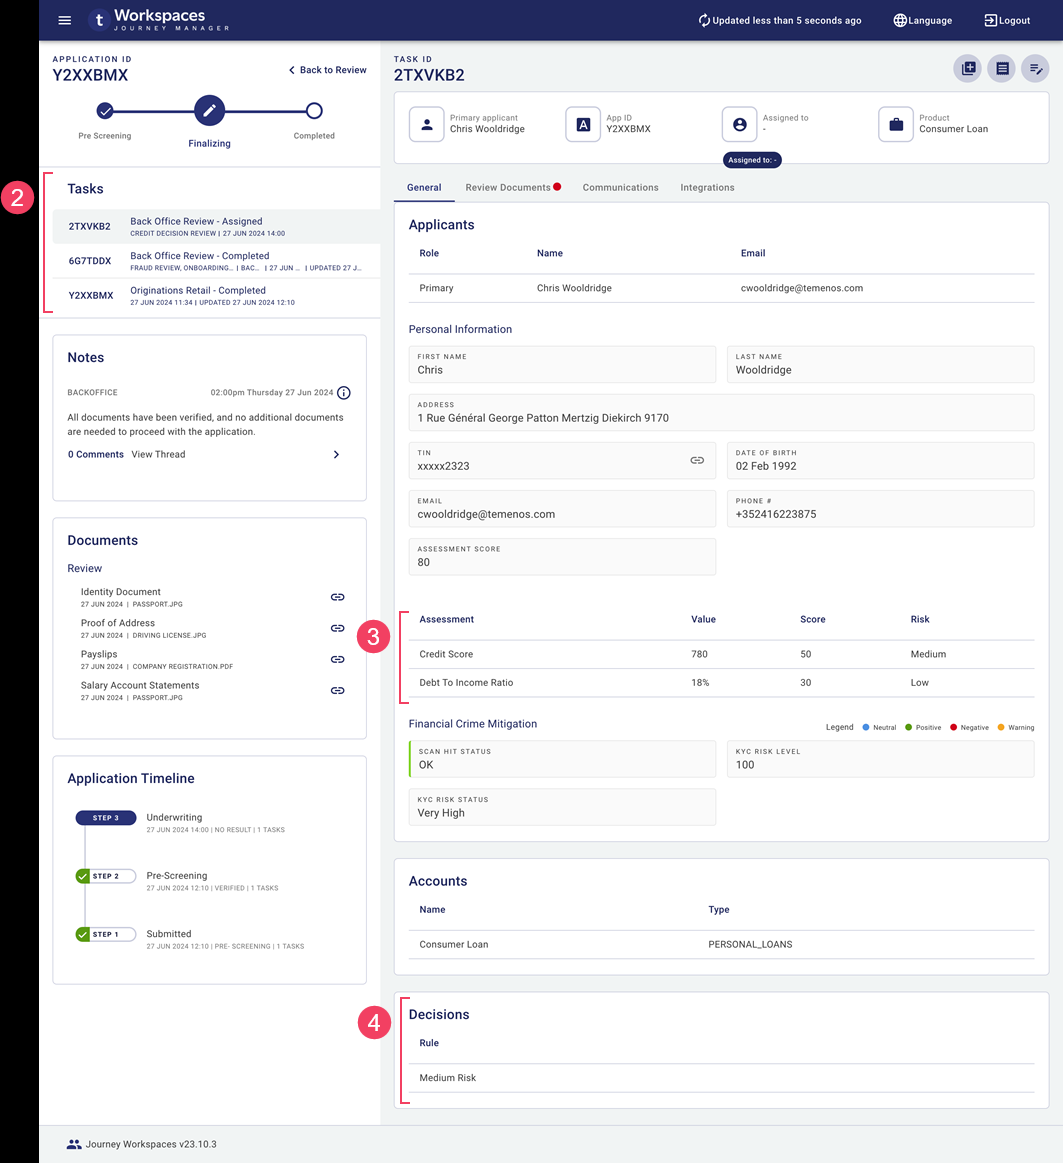
- Navigate to the Process > Review space and enter the application ID in the search bar to find the specific application.
Tasks
- The current task is assigned to the back office for review of the credit decision. Staff members need to check the tasks assigned to ensure they are reviewing the correct applications.
Assessment section
- Review the Assessment section to check the applicant's credit score. This provides a critical overview of the applicant's creditworthiness.
Decision section
- Examine the Decision section for the outcome of the overall decision engine's evaluation. This card displays the final decision based on the integrated evaluation criteria.
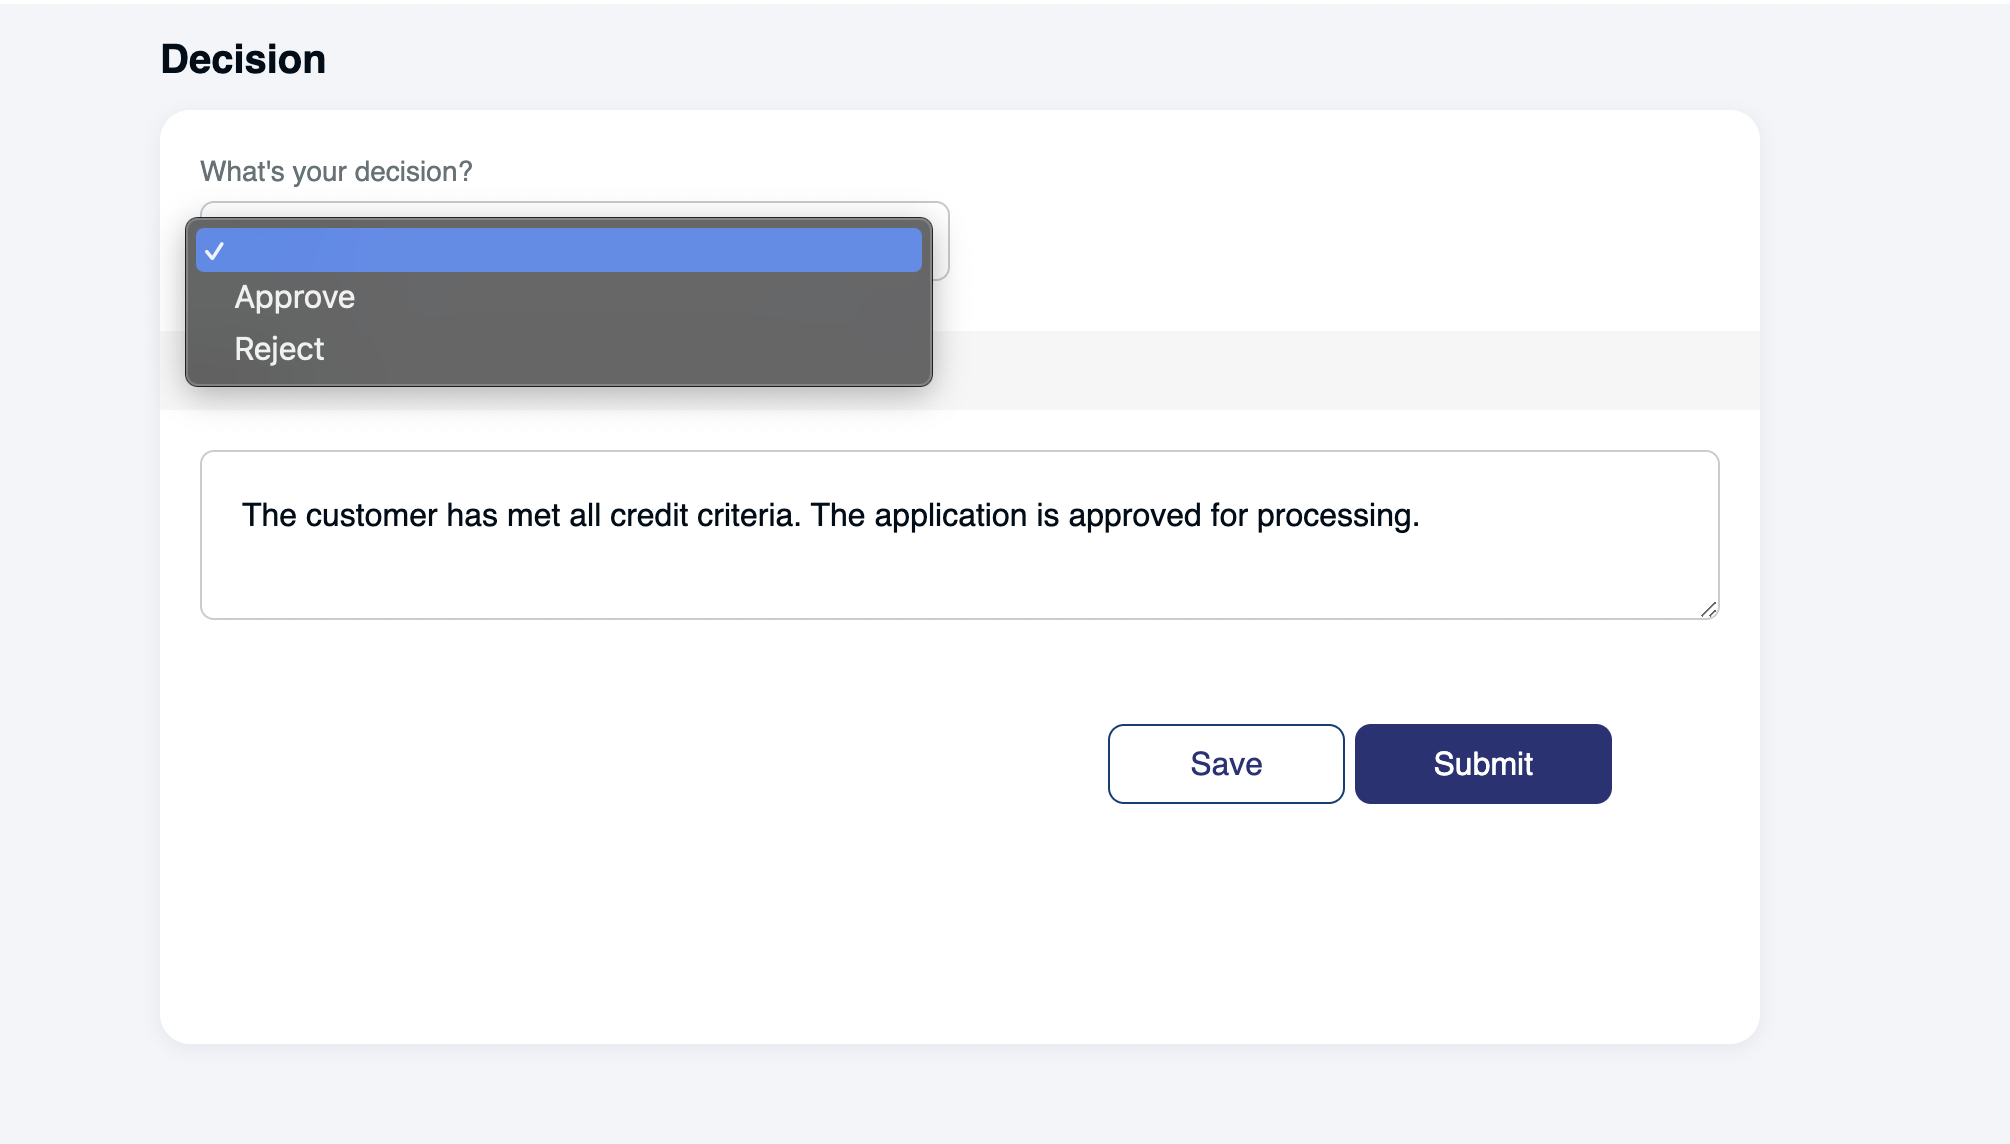
Make a decision
- After completing the credit review, click Decision to make a decision. Select the appropriate decision from the options provided. An email will be sent to the prospect detailing the outcome of the application and including the offer letter if applicable.
Screenshots
Process > Review Details
Review credit decision
Closing Step
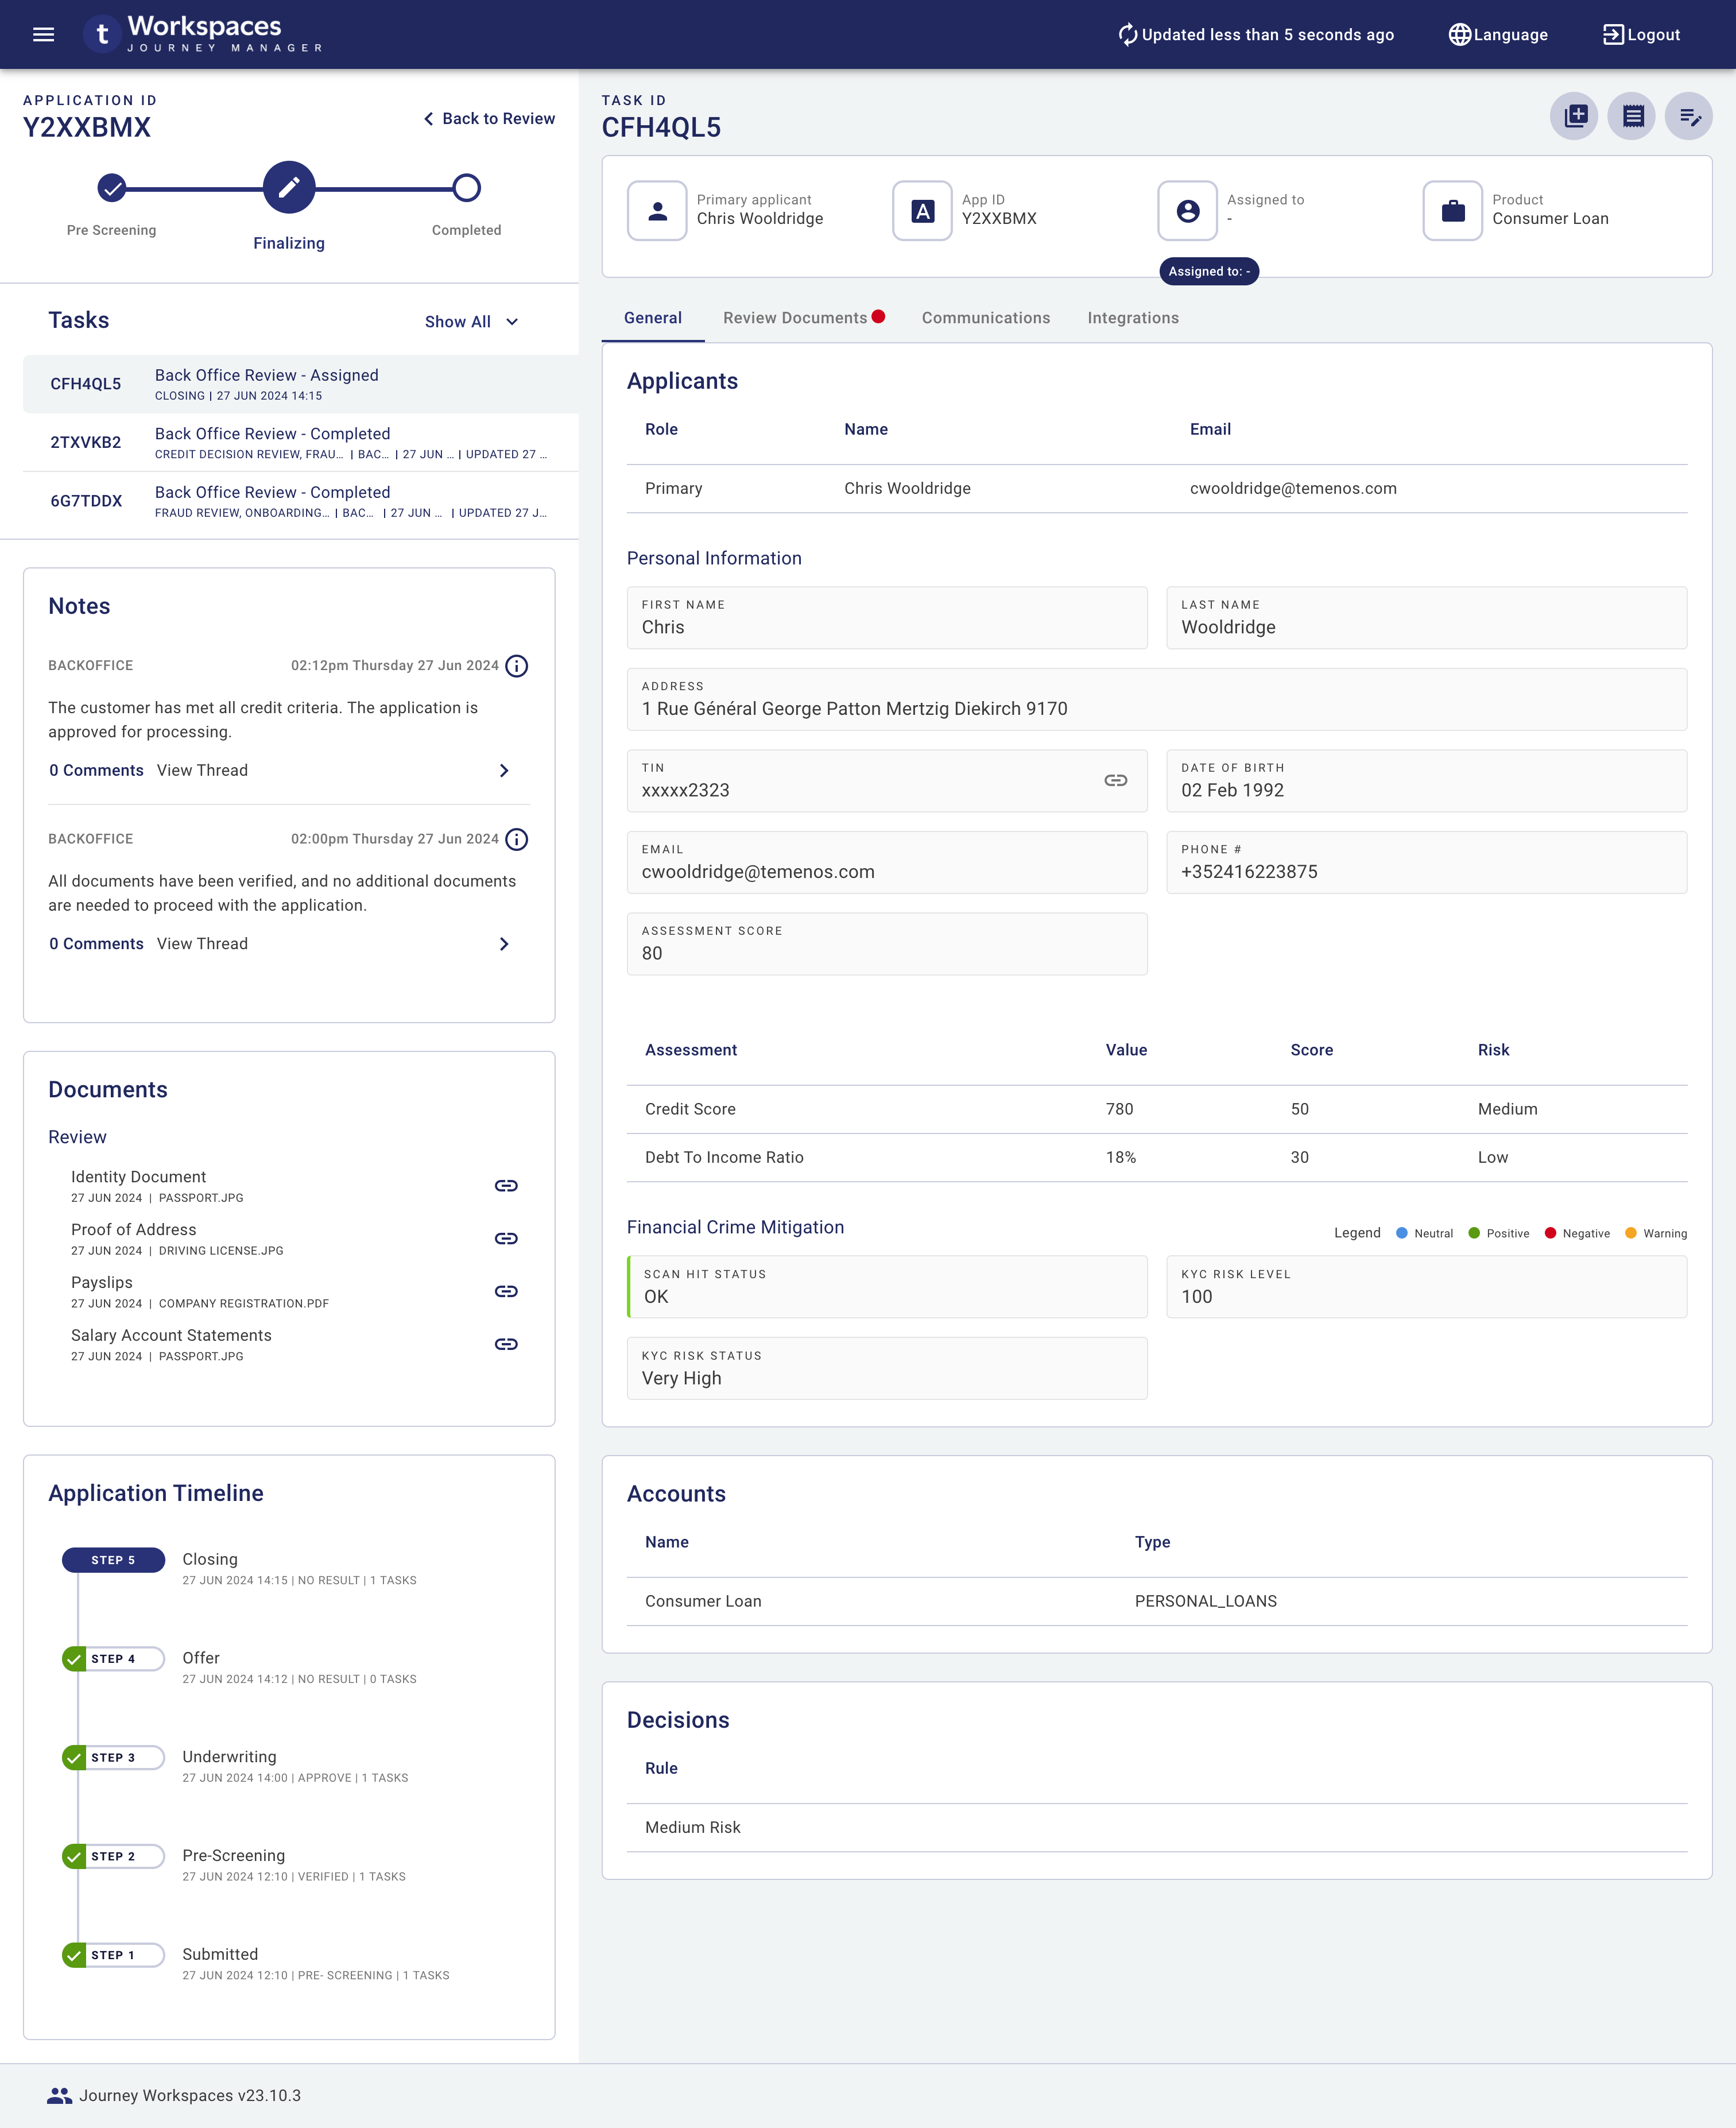
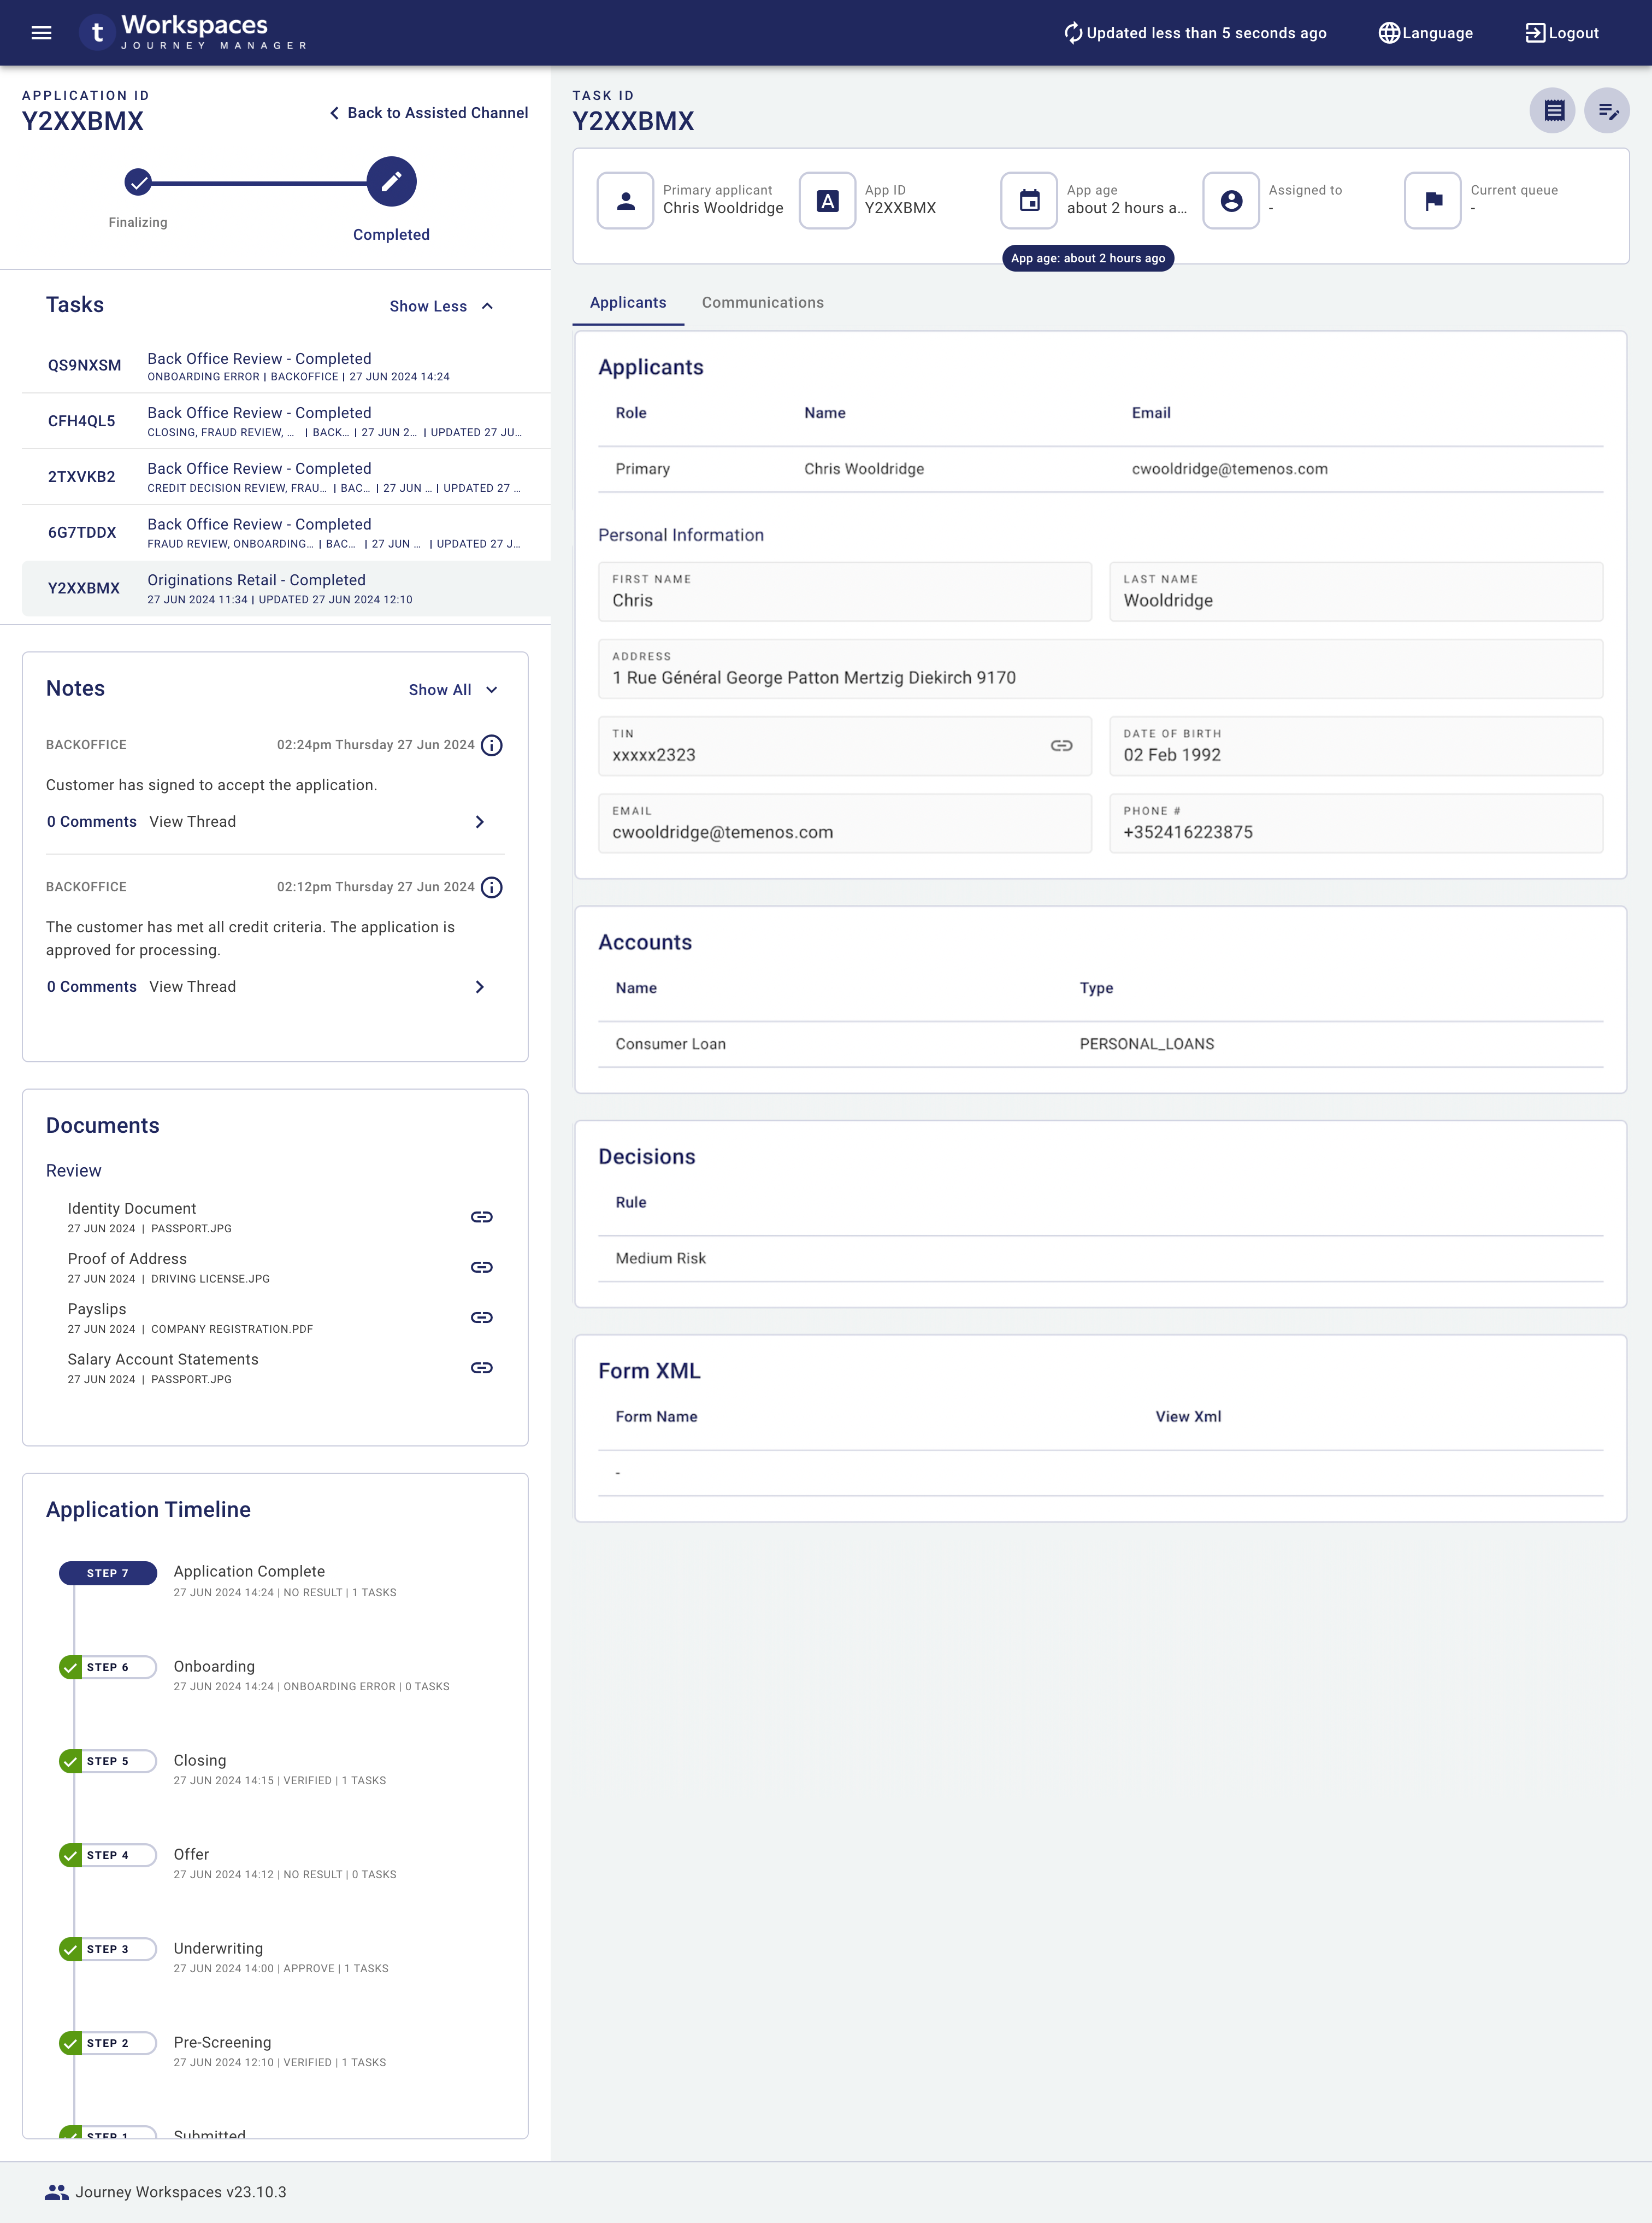
Locate the Application
- Navigate to the Process > Review space and enter the application ID in the search bar to find the specific application.
View tasks
- Check the tasks to see if the customer has accepted or declined the offer.
Review Accepted Offers
- If the offer is accepted, review the signed document and complete the verification process.
Complete Final Verification and Account Creation
- Once verified, an account will be created in Transact, and ready for online banking activation. The application will then be prepared for the next lending step.
Make a decision
- After completing the credit review, click Decision to make a decision. Select the appropriate decision from the options provided. An email will be sent to the prospect detailing the outcome of the application and including the offer letter if applicable.
Screenshots
Process > Review Details Closing
Process > Review Decision Closing
Assisted Channel > Details
Application Servicing
There will be instances where you need to help the applicants for various reasons. Here’s how to diagnose two common situations in the Helpdesk space:
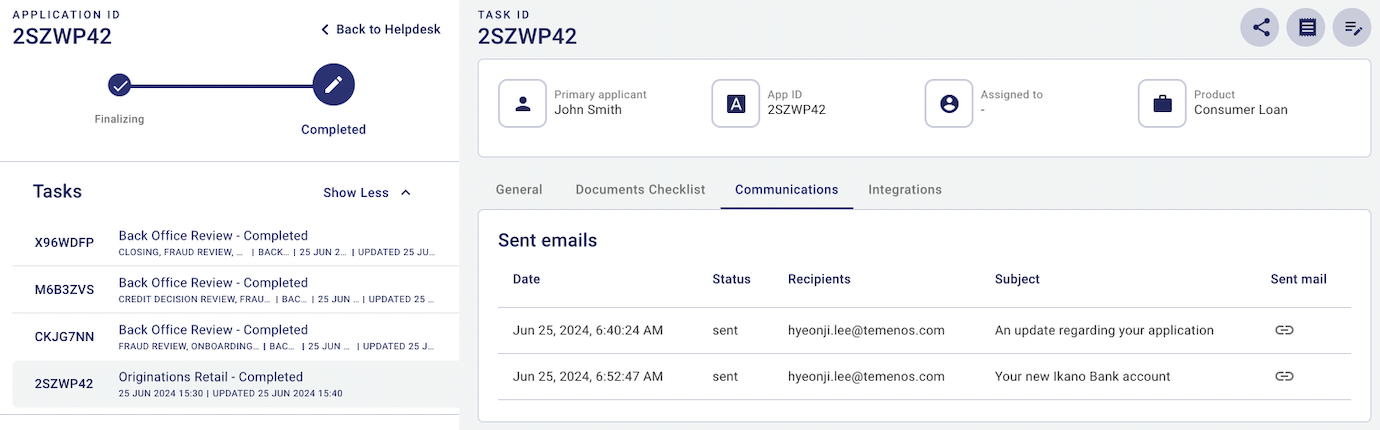
Viewing Email Content Sent to Customers
- Navigate to the Helpdesk space and enter the application ID in the search bar to find the specific application.
- Click on the Communications tab to view the content of emails sent to the customer. This can help you verify ongoing communications and address any concerns raised by the customer.
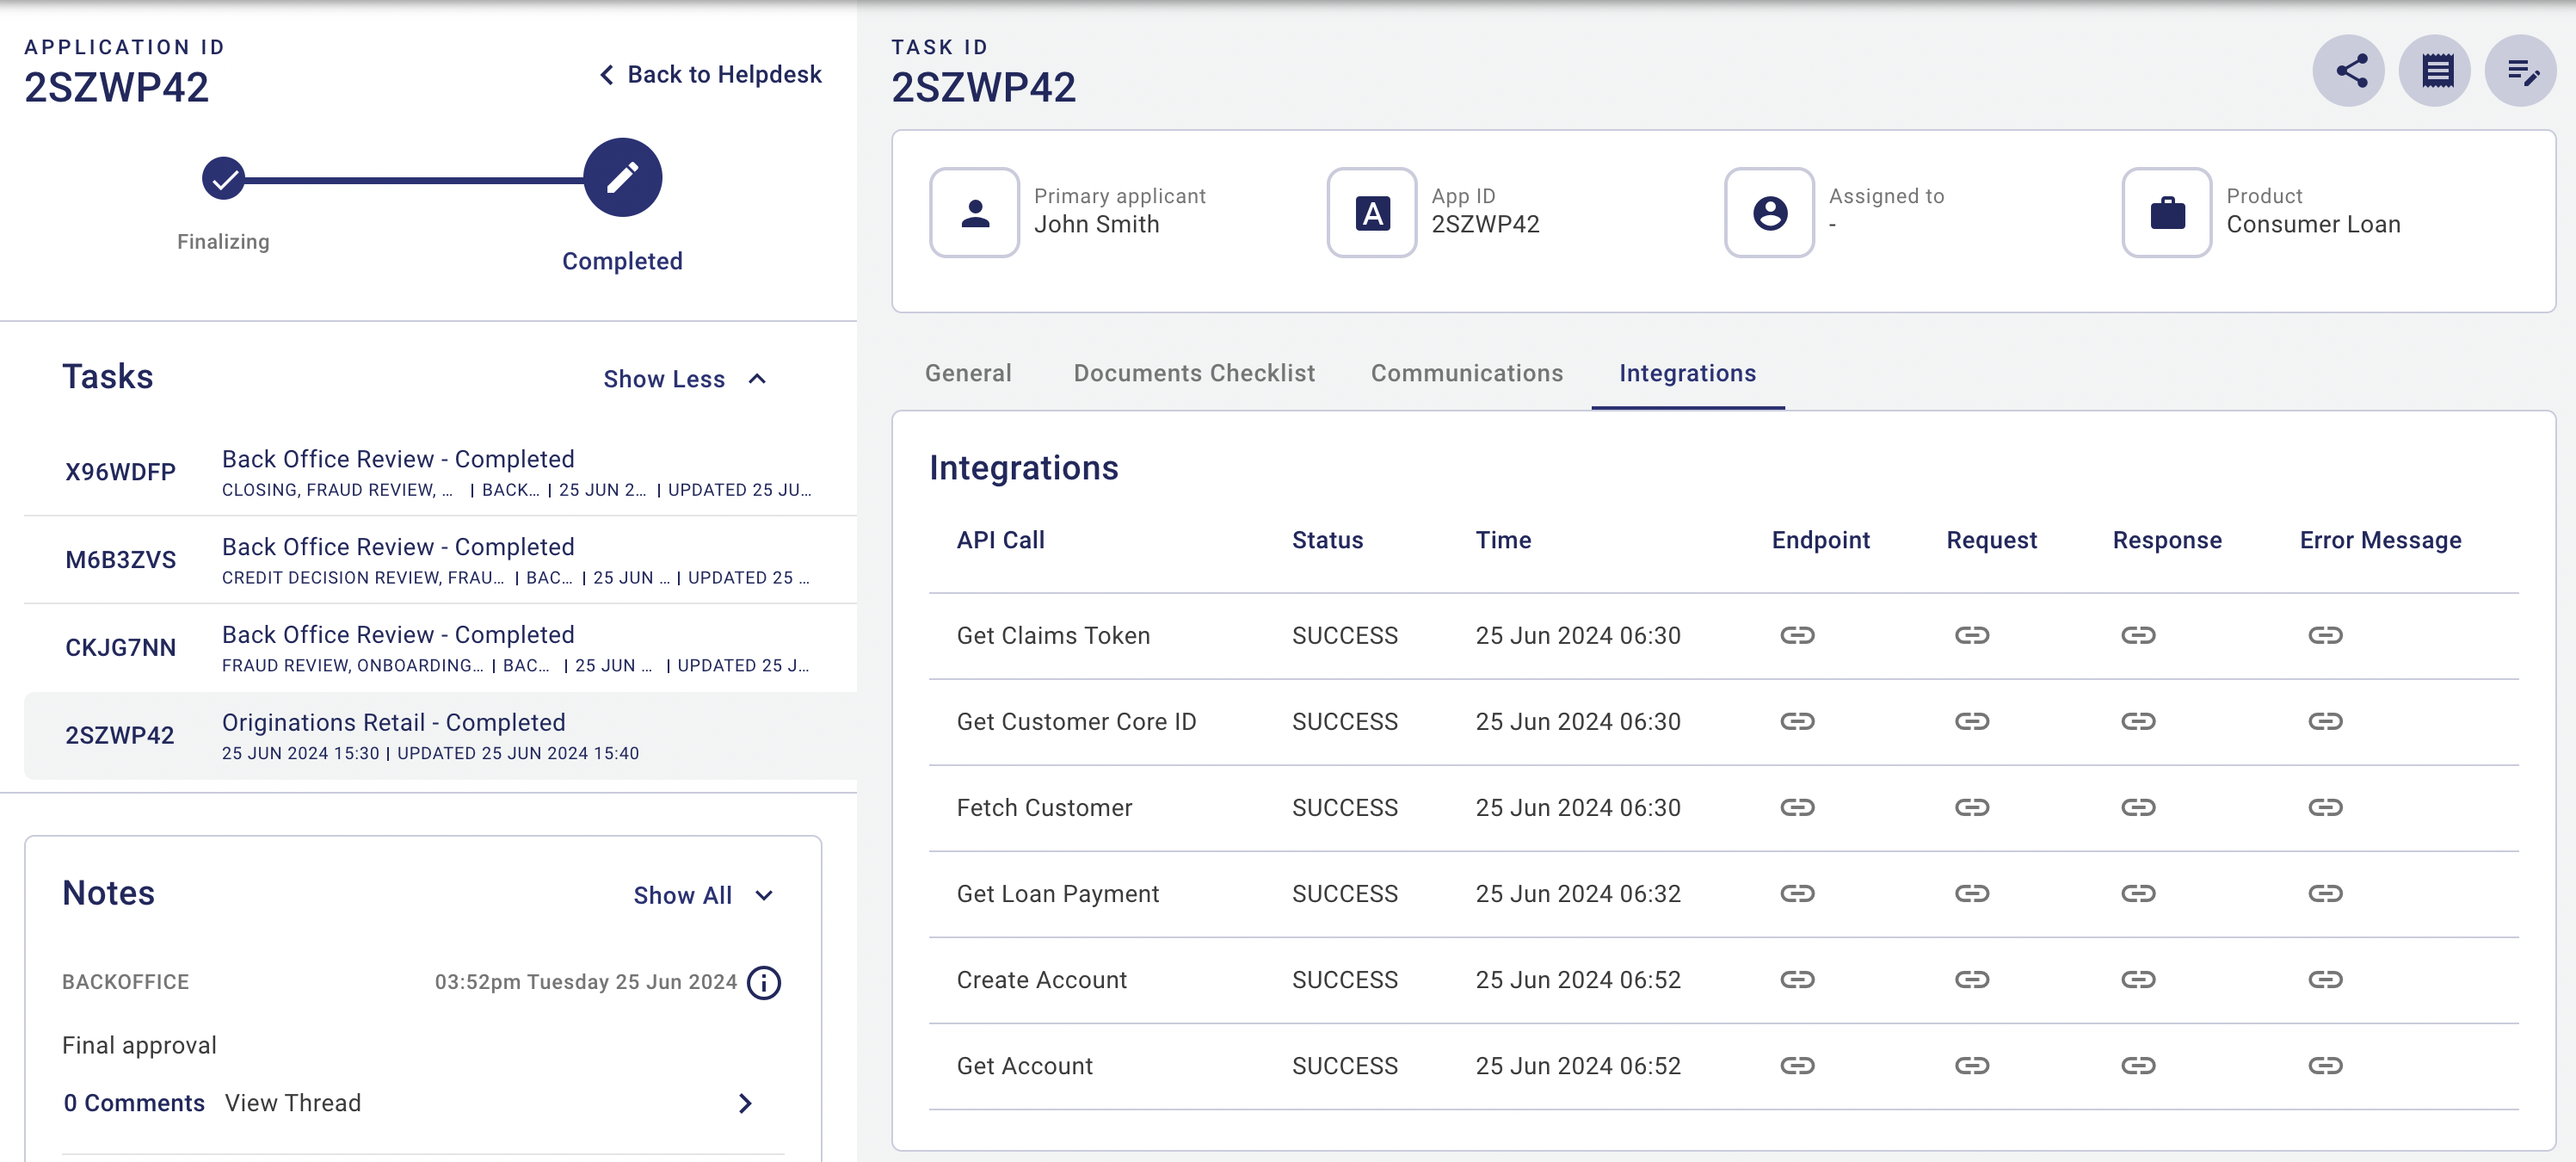
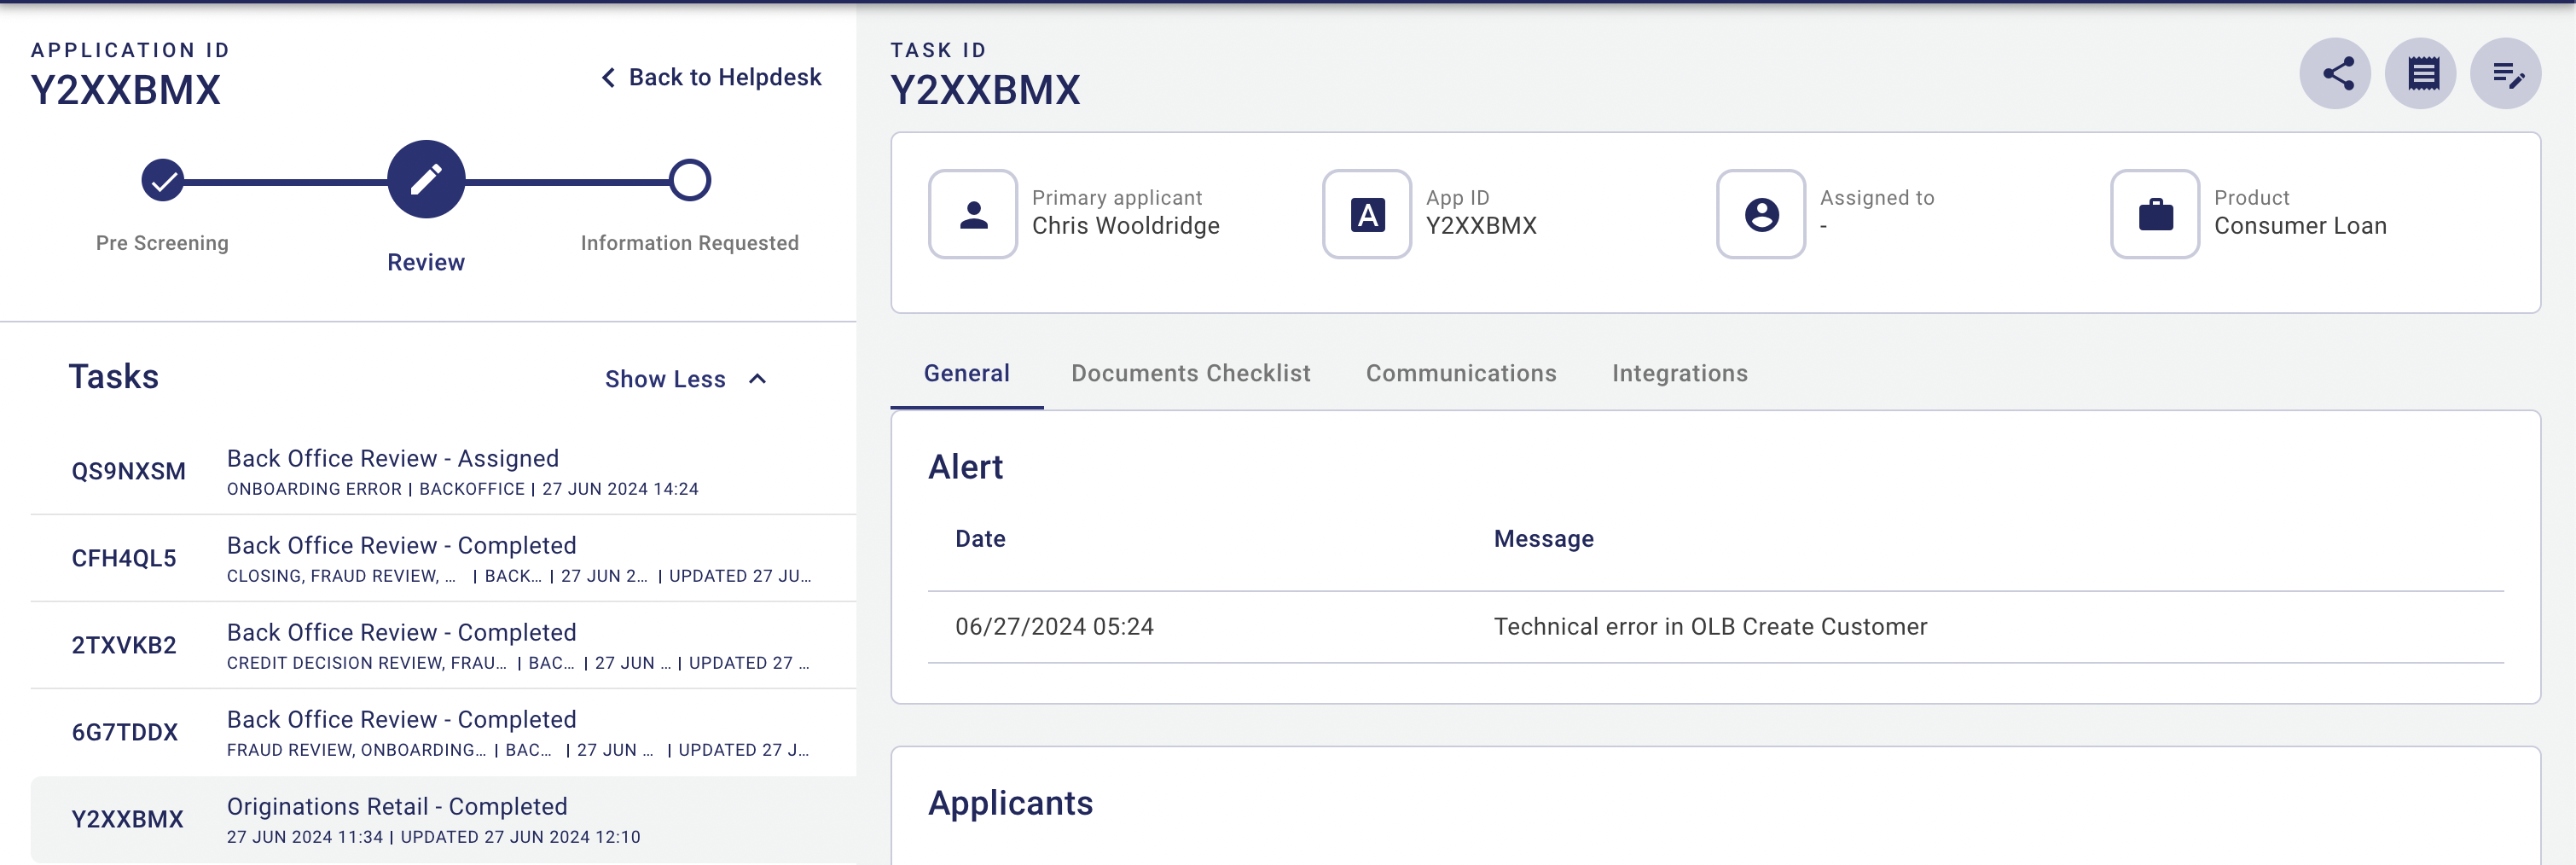
Diagnosing Onboarding Errors
- To understand and handle these errors, navigate to the Helpdesk space and enter the application ID in the search bar to find the specific application.
- Check the Alert section. This section provides specific information about the error, enabling quick diagnosis and resolution.
- If the error is related to API Integration failures, click on the Integrations tab to locate them. This detailed information will help in diagnosing and resolving the issue.
Screenshots
Helpdesk - Communications tab
Helpdesk - Integrations tab
Helpdesk - Alerts
In this topic