Enabling Authentication using JWT
This section helps you to enable the authentication for J2EE using JWT.
Marketing Catalog Microservice supports four stacks. They are Azure, AWS, and J2EE. AWS and Azure are authenticated by default whereas you need to enable authentication for J2EE.
To enable authentication for J2EE, you must configure and deploy the respective WAR files.
Configuration
Before deploying the WAR file, you must configure the WAR file of the required stack. To do so, you must perform the following tasks:
Prerequisites
Ensure that you meet the following prerequisites:
- If you want to enable authentication for the J2EE stack, you must download the j2ee-iris WAR file named
ms-marketingcatalog-j2ee-iris-DEV.0.0-SNAPSHOT.warand the J2EE package for must be up and running.
Generating JWT Token
JWT Token is usually generated and supplied by the other system which is consuming the endpoints published in the war. The public key in base 64 encoded format has to be configured in the war prior to the deployment.
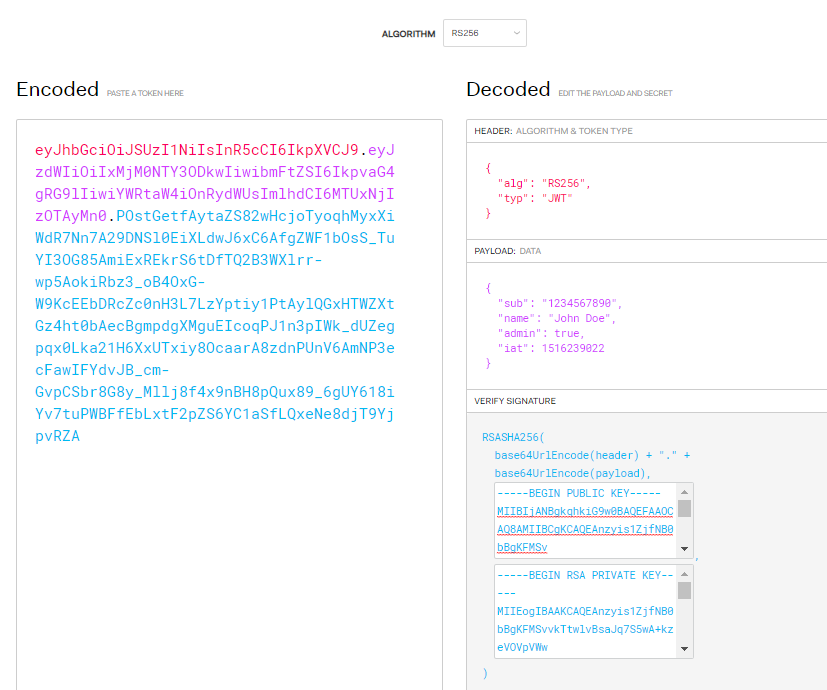
You can generate JWT token using JWT site. A sample token generation is given below.
{
  "alg": "RS256",
  "typ": "JWT"
}
{
  "iss":"Fabric",
  "aud": "IRIS",
  "sub": "Edwardmax",
  "jti": "a8b6a80f-c591-49d6-9436-fc2828f131a6",
  "name": "John Doe",
  "admin": true,
  "iat": 1574331424,
  "exp": 2574329624,
  "userId": "edward@temenos.com",
  "roleId": "INFINITY.RETAIL",
  "dbx_user_id": "1900086255261"
}
-----BEGIN PUBLIC KEY-----
MIIBIjANBgkqhkiG9w0BAQEFAAOCAQ8AMIIBCgKCAQEAvJ2hCzqes0QLdmRTpUgH
eoKGYwAcyz6Xq1zqeA27Led1mqyw6DNryzytmkB4cDuG4rWoAtruVbcvfP8Uv/gn
UwCAx6w8qoa8s3jkIcPS7Aip4AWNCI57ZFOJIMZ6lwHtaXH1hB/PIgbNx69HoudK
IG6X6QvVe9KXmheo+UlfljA52n3Zf9ByQ+/qCl7yrppCPbNOPqkhpMCFmCEk241N
X7qFVJe843V3nrpqwIz4NiXyr74lUZaTF5K4TsYvu+x0VzkaFzVQiiPL9BeBdfC3
bP8pbY0Wz0QFBMCEBPDDsYgDs6WqpVjnBrIVNeItfVchc+bpdSgYUYEDwDiUs7iB
8QIDAQAB
-----END PUBLIC KEY-----
-----BEGIN RSA PRIVATE KEY-----
MIIEogIBAAKCAQEAvJ2hCzqes0QLdmRTpUgHeoKGYwAcyz6Xq1zqeA27Led1mqyw
6DNryzytmkB4cDuG4rWoAtruVbcvfP8Uv/gnUwCAx6w8qoa8s3jkIcPS7Aip4AWN
CI57ZFOJIMZ6lwHtaXH1hB/PIgbNx69HoudKIG6X6QvVe9KXmheo+UlfljA52n3Z
f9ByQ+/qCl7yrppCPbNOPqkhpMCFmCEk241NX7qFVJe843V3nrpqwIz4NiXyr74l
UZaTF5K4TsYvu+x0VzkaFzVQiiPL9BeBdfC3bP8pbY0Wz0QFBMCEBPDDsYgDs6Wq
pVjnBrIVNeItfVchc+bpdSgYUYEDwDiUs7iB8QIDAQABAoIBAA3i6Q1jlnWKR/HC
dyoPAIXzgCNfyb7o78+s+pI2KJa7mLv3hNrDlmcTI5DcuEFDEK42Q5VaOvvSjct9
GDD9+x8wRUruElVXsCLifqFBwpCgHqmgnv6HRuxe/hSMqE/f03PU8Qd2NBDEQXg3
HmYO8zUqD0MYHPKN0Z2FqmoYDdKHwAv4tRKjOOrmdQZyDRWYob4cgYZllrAXOzB5
Ylg8WSfNZYuOXqU8bT919jZ97xeeDHGG/YMe5mqV2qAKGHzSqsT4EnB1ncceJLvv
HsqKbql3eLkrTj1ZmrRhR319IIEgaKZzeORwpCjfShQLB+XQmAPQIxekysHMpqpm
9NMeg0ECgYEA4jyPLrgJwDyPIMg1thVp3qPDKdswKEFbcIxb0BirB8OB6hZfBxvq
Nwm4vBBLknMeLKbHZElIZIbPThtH9ALjrN4sKLqcLWyLYxrtIYHE+TeGxE7g6dBg
iM3RPweYXfrvXhMeSSw7XZOmOo4gN7cXEMN8XvUWjWiDoVXHf9xCMykCgYEA1W4I
7Y+SuSHH06mr1b1V/Q5HYxtqRdxDUra+OyenyEgYs2LxBPYfyUNJpR06C23496py
RMRe3cl3iDyv0Elk6GMzEbLCglBgBJEEB3kDg9n+MdUv5QP9iIZPC1Q4TFasgIwz
leXoLs0B1De/oPHIsixL03cbp73ixzikKcuPOYkCgYALIR+KFNOl+VSxMCg0ROlo
YnX/YSEFWfG9n6oEmrIPN7b0ZRVXrC/hdUD5P3P4SGF7oNi+PjypdVhNZ1oqztmU
b3mMp2F3epeA0JpJw7CE8g5XKeo2lmGpWTap+x2rweR0pEwhHWPuPo025DcBhqhD
0toTccsiObn//dBKofM/wQKBgDJfoiPPuyWO34cJiNENuvnbIOY3VkHe1tTy5Ls5
hNQ0j//m3lP5c08hXoRl/YktD5IE3Kt2XZ2jK18wU56pc/OVVjxbIKV5KvBo+bZ5
zWaVUPWaB4/Z/UD30jguTItX+abtcE90z/Qb1s6rycLGzkOfSNZESnawzpGOwNBM
hyVhAoGAKS+N2PP4CDJ9Fbgbdc/wglT0Tcv84e69nbwaZ40N64NRs2m/g7WSAFcr
q/VGsSQFls/RZ69aS75zj1mYCeqV7uwe2R0t96caXyVQN7suge26mebrlAUMMiBV
7TVNa21Uxrn5fpvN4zKcGKn4O4E9/Ul8fqOWzoHeKIXdCvVVX5o=
-----END RSA PRIVATE KEY-----
A sample screenshot (Debugger) from JWT site is given below.
Configuring JWT
This section helps you to configure JWT.
Procedure:
- Uncomment the following in Web.xml.
 Classpath
classpath:spring-jwt-iris-authenticator.xml
Filter<filter> <filter-name>springSecurityFilterChain</filter-name> <filter-class>org.springframework.web.filter.DelegatingFilterProxy</filter-class> </filter> <filter-mapping> <filter-name>springSecurityFilterChain</filter-name> <url-pattern>/*</url-pattern> </filter-mapping>
- Comment the NullBean and Uncomment T24SpringSecurityContextFilter as shown below in applicationContext.xml .Security Filter
<!-- <bean id="t24SecurityFilter" class="com.temenos.irf.comms.security.defaultimpl.NullBean" /> -->
<bean id="t24SecurityFilter" class="com.temenos.irf.security.t24.T24SpringSecurityContextFilter" />
- Set the claims that required to be extracted from the jwt payload and token validation parameters in spring-jwt-iris-authenticator.xml.
- Set the value of principalClaim as sub, issuer from JWT Token payload (Fabric), and public key in base 64 format in pkEncoded.Token Validation Parameters
<beans:bean id="oidcProviderServer" class="com.temenos.security.oidc.common.OidcProviderServer"> <beans:property name="issuer" value="Fabric" /> <beans:property name="pkEncoded" value="TUlJQklqQU5CZ2txaGtpRzl3MEJBUUVGQUFPQ0FROEFNSUlCQ2dLQ0FRRUF2SjJoQ3pxZXMwUUxkbVJUcFVnSA0KZW9LR1l3QWN5ejZYcTF6cWVBMjdMZWQxbXF5dzZETnJ5enl0bWtCNGNEdUc0cldvQXRydVZiY3ZmUDhVdi9nbg0KVXdDQXg2dzhxb2E4czNqa0ljUFM3QWlwNEFXTkNJNTdaRk9KSU1aNmx3SHRhWEgxaEIvUElnYk54NjlIb3VkSw0KSUc2WDZRdlZlOUtYbWhlbytVbGZsakE1Mm4zWmY5QnlRKy9xQ2w3eXJwcENQYk5PUHFraHBNQ0ZtQ0VrMjQxTg0KWDdxRlZKZTg0M1YzbnJwcXdJejROaVh5cjc0bFVaYVRGNUs0VHNZdnUreDBWemthRnpWUWlpUEw5QmVCZGZDMw0KYlA4cGJZMFd6MFFGQk1DRUJQRERzWWdEczZXcXBWam5CcklWTmVJdGZWY2hjK2JwZFNnWVVZRUR3RGlVczdpQg0KOFFJREFRQUI=" /> <beans:property name="pkCertEncoded" value="" /> <beans:property name="pkCertFilePath" value="" /> <beans:property name="pkJwksUri" value="" /> <beans:property name="decryptingJwkEncoded" value="" /> <beans:property name="principalClaim" value="sub" /> </beans:bean> - Set the list of claims to be extracted from JWT as shown below.Claims
<beans:bean id="requiredFields" class="com.temenos.irf.web.security.jwt.parser.RequiredFieldsExtractor">
    <beans:property name="claimsToExtract">
        <beans:list>
            <beans:value>userId</beans:value>
            <beans:value>roleId</beans:value>
            <beans:value>dbx_user_id</beans:value>
            <beans:value>registeredCompanyName</beans:value>
            <beans:value>customerId</beans:value>
            <beans:value>jti</beans:value>
            <beans:value>client_id</beans:value>
         </beans:list>
    </beans:property>
</beans:bean>
- Set the value of principalClaim as sub, issuer from JWT Token payload (Fabric), and public key in base 64 format in pkEncoded.
Deployment
After configuring the WAR file, you must deploy the configured WAR file on the J2EE Complaint Application Server. This section explains you about how to deploy the configured WAR file for the following stacks:
J2EE
Before deploying the authenticated WAR of J2EE, you must set up the following:
Procedure:
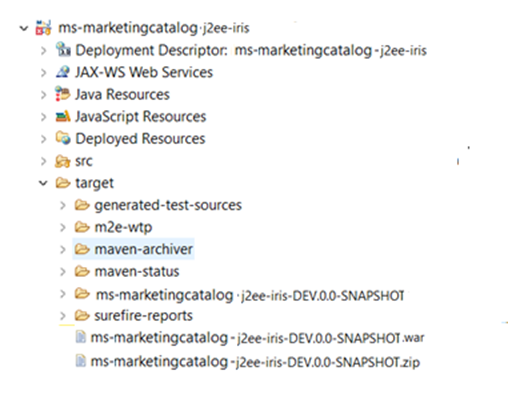
- Marketing Catalog j2ee iris war is generated under the target folder of the container project.
- Perform the JWT token configuration in the generated war.
- Deploy the generated war under the JBoss deployments folder.
- For JBOSS, copy the artefact to the jboss/standalone/deployments folder.
- For WebLogic, navigate to http://localhost:9001/console based on the URL configured while installing the server, and using the Install button, deploy the artefact.

- Once the Marketing Catalog Microservice is up and running in application server, check the API's in the package with a JWT token.
The format of API's URL is given below:
- Base Path
http://<IP_ADDRESS>:<PORT>/<context-root>/api/<version>/
For Example: http://localhost:8095/ms-marketingcatalog-api/api/v1.0.0/
- Resource path of the endpoint can be found in the APIs document. A sample endpoint of Marketing Catalog is http://localhost:8095/ms-marketingcatalog-api/api/v1.0.0/product/products.
In this topic